Home
Contact Us
Small Diameter Tube Inspection
Small Diameter Tube Inspection
 Tubular Heat Exchangers are vital to the operation of a plant. Failures are considered unacceptable both economically and environmentally. Failure is usually caused by corrosion or erosion of the tube wall. Regular inspection is the best means of detecting wall loss at an early stage.
MB Inspection provides sophisticated equipment and experienced personnel for inspection of small diameter tubing from 12.5mm to 75mm ID. The company has various techniques available from electromagnetic to ultrasonic probes to miniature video cameras.
All inspection systems, used either individually or in harmony will detect general corrosion, tube thinning, pitting, baffle plate fretting and in some instances, both circumferential and longitudinal cracking. Defects as small as a 5% loss in wall thickness can be detected. Hard copy is available of all areas scanned. The final report includes a colour coded diagram of the front tube sheet indicating all wall losses by tube.
For further details of these systems and other specialist inspection applications contact MB Inspection.
Eddy Current
 Basic Principle
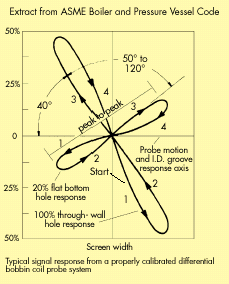
Eddy currents are alternating electrical currents induced into a conductive material by an alternating magnetic field. Uniform, unflawed tubes produce a stable amplitude and phase pattern on the display. A flaw or change in thickness modifies the induced currents and this is reflected in the display. The inspector interprets the changed display pattern to determine the nature of the flaw or anomaly.
Should the passage of the induced currents within the material be modified in any way then effects of the change in value in the induced currents can be analysed and presented so that the NDT inspector may interpret the possible cause of their modification.
Probe Configuration
Several different probes are available:
- Absolute Probes – Useful for measuring conditions which change slowly along the tube, such as gradual metal loss (thinning).
- Differential Probes – Provides an accurate evaluation of small defects such as internal or external pitting.
- Frequency – Influenced by several factors including the tubing wall thickness, the conductivity of the material, and the required form of response.
- Size – To obtain the most sensitive test it is essential that the probe fit the tube as well as possible. A minimum fill factor of 0.7 is recommended.
Features
- Can be applied to a wide range of non ferrous tubes.
- Relatively fast typically 60-80 tubes per hour.
- Air driven constant speed probe puller linked to the strip chart recorder for accurate defect location.
- Can detect gradual wall loss and sharp pitting defects.
- Eddy current systems are lightweight and battery operated.
Centest 91
Basic Principle
The Centest 91 is neither an eddy-current nor a flux-leakage system. A probe is passed along the inside of the tube, the tube wall is partially magnetised and detectors on the probe sense the presence of imperfections in the tube wall. The scan results are available as a permanent chart recording. The operator can give an immediate assessment of the tube or retain the data for interpretation at a later date.
Features
- Ferrous tubes can be inspected in size range 15mm OD to 100mm OD.
- Examination speed is typically 40-50 tubes per hour (15ft-40ft in length).
- Air driven constant speed probe puller linked to the strip chart recorder for accurate defect location.
- Possible to scan around reasonable radius bends with the appropriate probe.
- Data collected by a probe is recorded and displayed on a three channel chart recorder.
- In good quality, seamless carbon steel tubes 1mm diameter holes and 5% general loss of wall thickness can be resolved.
- AC mains, single phase 50/60Hz with automatic range selection between 90 to 116 volts and 210 to 250 volts.
Internal Rotary Inspection System (IRIS)
Basic Principle
IRIS uses an immersion pulse-echo technique. The probe is centred in the tube to be inspected and ultrasonic pulses are transmitted along a path parallel to the tube axis. These pulses are then redirected radially to the tube wall by a 45° mirror. The mirror rotates at high speed and scans the ultrasonic beam around the tube circumference. Successive pulses build a screen image of the tube cross section at any given point.
Features
- Ferrous or non ferrous tubes can be inspected in size range 12,5mm to 75mm ID.
- Extremely accurate (± 0.05mm).
- Examination speed is typically 10-12 tubes per hour.
- Storage of all test parameters and data including screen images.
- Menu driven operating system.
- Defect accurately located within tube.
- IRIS is transportable and lightweight.
A source of 110v power and a clean cold water supply are required. Tubes will usually require cleaning before inspection.

